Tuesday, May 8, 2012

Easy DIY Customize Any Pair Of Jeans


Fun way to fix holes or redo pre made holes.
Take any pair of jeans. I got these ones for $5 at Plato's Closet. They came with pre made holes. I personally  do not like the pre made holes. So I put some fun fabric underneath.


Turn your jeans inside out.  Cut the piece of fabric a bit larger than the hole.

  Lay some strips of fabric adhesive around all the sides of the hole. Lay the wrong side of your fabric up. So the right side is touching the wrong side. Then take a damp towel lay it over the fabric and jeans. Then with your iron set on wool place the iron holding it for about 40 seconds around the sides where the fabric adhesive is. Don’t rub the iron just set it. The heat and water activates the adhesive. Repeat until it is taped down.

When the fabric adhesive is set properly turn your jeans right side
 out.


Painting your jeans.
 I use Delta Cream Coat Textile medium with Cream Coat acrylic paint. Mix 2 parts acrylic paint with 1 part textile medium or whatever the instructions are on the bottle. Then paint whatever designs you want on to your jeans. You will probably have to do a couple coats. Then let it dry. Once it’s dry heat seal it. Take a town place it over the design and with your iron on the highest setting run it over the design several times I do it for about a minuet. Make sure there are not any globs or rough spots it should all be smoothed down. Wait 7 days before washing. When you wash use Woolit or any other soft soaps do not use laundry detergent.  Run on the hand wash setting or the lowest setting of your washing machine. Line dry

Friday, December 2, 2011

Hair Accessories Storage, DIY, and Super easy to do.


If your like me you have a million hair accessories that are just everywhere.  I needed a way to get them out of the way but didn’t want to spend money. Here is a  way to store your hair accessories. Didnt cost me anything to make. All you need is an empty canister, some fun fabric, and a hot glue gun.

 I found an empty cashew canister. You could use any empty canister.
All you do is hot glue some fun fabric over it. Make sure your fabric goes over the top so the edges don’t tear up your headbands. I added a big bow with a strip of fabric because everything needs a bow.

There you have it. You can keep your hair ties inside and your headbands on the top.

Saturday, November 19, 2011

DIY An Affordable Comfy Gift Idea


I got these super comfy moccasins at 579 for $7.80. Then I just bedazzled the tops of them. I just buy the refills at Wal-Mart for close to $5 and you get A TON of stud’s and rhinestones. You can by the bedazzler for $10 I don’t find that it works very well and it’s a lot more accurate and you break less studs if you just do it by hand. All you do is poke the stud or rhinestones through the top and using a butter knife or bend the pokey things on the back of it in to secure it. You can use whatever colors you want, whatever pattern you want, and place them wherever you want. 

Sunday, November 13, 2011

Taking Old Jewelry and Turning It Into New Jewelry

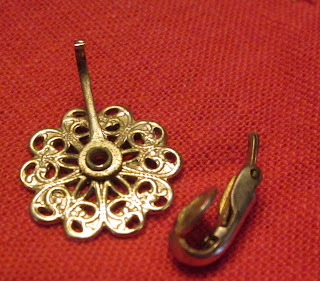
I had gotten a ton of antique clip on earrings that were from my grandmother and great grandmother. They were beautiful but they hurt my ears so I couldn’t wear them.  So I took them apart and used them to make a beautiful antique styled bracelet. 


 I liked the rectangle ones I loved the colors.  I noticed they had holes on the sides so I decided to turn them into beads. So I took them apart. Using pliers I took off the part of the earrings that clip on to your ears. You just wiggle them a little back and forth and they come right off.


Then I took a pink clip on earring and using wire cutters cut the wire in between the beads and took them apart. I used the pink beads to make earrings which I will another tutorial on how to make earrings later.


  I noticed the back of the earring had this beautiful snowflake like pattern to it. So I turned it into a charm
Again using pliers I took off the part of the earrings that clip on to your ears. Wiggle them a little back and forth and they come right off.


Using the pliers bend the extra metal in towards itself creating a loop you may have to straighten it out and adjust it a little. The metal was very flimsy and easy to bend.


Then I took a necklace. Cut the string and took off the beads. 

Using the clip on earing and the beads from the necklace and some other beads laying around and  I arranged it how I wanted it.


            Then I strung them with elastic. I strung a piece of elastic through the top left row, strung it trough a crimping bead, then through on of the holes of the rectangle bead, then back through the crimping bead and using crimping pliers squeezed it shut. I repeated this for the second row. I repeated this for the top row of the middle section and the bottom. Then I repeated it for the top and bottom row of the right side.  Then take the ends of the top row and square knot them together. Then take the ends of the bottom row and square knot them together. It is recommended that you put a drop of glue on the knots to seal them.


Voilà! your finished product is a brand new antique styled bracelet.


Sunday, October 23, 2011

DIY, cheap, silhouette, home décor


Instead of paying close to $50 for a large canvas, I went to Ikea and bought a plan white table top 29 in.X 34 in. for $5.99. Then I used Americana Lamp Black acrylic paint which is $1- $2 a tube. I fee handed the design. After 24 hours I’m going to spray a clear seal on it to help the paint last longer and protect it a little better. It took me a little less than two hours to do.


Silhouettes are classic and can fit into almost any room. You can use whatever colors you want for the design. And any shapes to match any theme.

Monday, October 10, 2011

Miss Jade's Spider Threads Fashion Lookbook


 My good friend Heather Sanders Photography and I  put together a fashion look book.
The shoes and bags are mine. 
The models are my friends Sammie Schneider and Kim Schnabel.
The makeup was done by my wonderful friend and mentor Teresa Cash.


Monday, October 3, 2011

Flats


I found some white flats from Wal-Mart for a super low price of $7.00. Then I drew on them with sharpies. They have a really nice glossy finish to them that the canvases shoes don’t have. Flats are very versatile you can wear them with jeans and dress them down a bit or you can wear them with a dress to dress them down bit still look classy.